Year 3
Curriculum Map
- Lesson 1 - Week 1
- Lesson 2 - Week 1
- Lesson 3 - Week 1
- Lesson 4 - Week 1
- Lesson 1 - Week 2
- Lesson 2 - Week 2
- Lesson 3 - Week 2
- Lesson 4 - Week 2
Outcome
- To understand soils are made from rocks and organic matter.
- Investigate soil from the local environment.
- Fully investigate a tray of soil and collect words to describe the appearance and texture.
- This collection might include dirt, earth, mud, worms, crumbly etc.
- What is soil made of? List the parts that can be identified – use magnifiers to help.
- A very short clip which shows different types of soil from www.bbc.co.uk
Outcome
- To examine what a soil sample is made from.
- Maybe you can have one sample with more compost and another with some pebbles and sand.
- Children explore two different soil samples.
- They identify differences and similarities, looking for sand, plant parts, water and minibeasts, rocks, fossils etc.
- They can create an observational drawing and write a description of each sample.
Outcome
- To understand the process of fossil formation and be able to describe it in simple terms.
- Reporting on findings from enquiries, including oral and written explanations, displays or presentations of results and conclusions
- http://www.planet-science.com/categories/under-11s/our-world/2011/10/what-makes-fossils.aspx – Short animation explaining how fossils are formed;
- http://www.oum.ox.ac.uk/thezone/fossils/intro/form.htm – This page from The Oxford University Museum Learning Zone gives a good illustrated child friendly account of how fossils are made.
Outcome
- To discover the contribution to science of the great 19th century fossil hunter Mary Anning
- http://www.bbc.co.uk/education/clips/z4r4d2p – This 15 minute class clip gives a good child friendly summary of Mary’s life and could be used instead of the teacher in role activity if preferred or watched in preparation for the role to supplement the Mary Anning Notes (it may also help you to tune into the Dorset accent
Outcome
- Compare and group together different kinds of rocks on the basis of appearance
- Observe rocks closely and discover that they have different qualities and features.
- Group rocks in different ways according to their observable features. Be able to name 6 common rocks.
- Collectively make a list of questions on rocks that can be answered through a range of scientific enquiries during the course of the topic
Outcome
- To investigate the properties of rocks.
- Children can carry out an investigation to place a selection of rocks in order of hardness.
- They predict and then test whether a rock can scratch each of the other rocks.
- They use their simple results table to create a frequency table and bar chart, and finally attempt to place the rocks in order of hardness.
Outcome
- To investigate the properties of rocks.
- The Acid Test Discuss safety guidelines for using vinegar/ acid
- The Hardness Test
- The Water Test
- Task Sheet to record agreed method and observations
End of topic assessment
- Lesson 1 - Week 1
- Lesson 2 - Week 1
- Lesson 3 - Week 1
- Lesson 4 - Week 1
- Lesson 1 - Week 2
- Lesson 2 - Week 2
- Lesson 3 - Week 2
- Lesson 4 - Week 2
Outcome
- To explore the requirements of plants for life and growth how they vary from plant to plant.
Outcome
- To set up an enquiry to test our theories on what plants need to grow and thrive.
- Bean Seedling Investigation – What can we do to find out how important your requirement (e.g. light, water) is?
- Gather ideas. Yes we will need to see if plants can grow without that requirement over a length of time.
- Discuss how you can control your requirement. How will you know whether it is the lack of light/warmth/soil, etc. that has affected it? Yes, you will need to grow other seedlings to compare it to. You could compare seedlings with plenty of your requirement, a little of it and none at all.
- Suggest that each group plants 3 seedlings setting up each with a different amount of their requirement.
Outcome
- Investigate the way in which water is transported within plants.
- Children can predict and measure how long it takes for coloured liquid takes to rise up the stem of a carnation flower and colour its petals.
- They can make a drawing of the flower at the start and end of the investigation and predict what would happen if the flower had a shorter stem.
Outcome
- To design your own plant. Ask the children to design and draw their own plant.
- They will need to label the main parts and annotate their drawing with the functions of each part.
- Creative: Make a plant
- Using a variety of materials, ask the children to create their own plant. It should have the four main parts of a plant.
- Here are some ideas for materials: Stem – cardboard tube from foil or cling film roll, straws, Roots – long pipe cleaners, wool, string, Flower – cake cases, milk bottle tops, paper plates, Leaves – card/paper
Outcome
- To observe a range of different flowers closely to identify the different parts using magnifiers.
- Children can record observations using pencil and watercolour
- A short film on how flowers make seeds from www.bbc.co.uk
- Lovely film clip showing the bee waggle dance from www.bbc.co.uk
- The Flight of the Bumblebee by Rimsky Korsakov from www.YouTube.com
Outcome
- I can explain the functions of the different parts of a flowering plant.
- Children label a diagram of a flowering plant.
- They explain the function of the flower, stem, leaves and roots.
- Children can cut and paste descriptions or write their own.
Outcome
- I can describe the life cycle of a flowering plant.
- Children read about the 4 stages in the life cycle of a flowering plant – germination, growth, flowering, and fertilisation/seed production.
- They create a life cycle diagram, cutting and pasting descriptions and pictures or writing and drawing their own
Outcome
- To identify that animals cannot make their own food; they get nutrition from what they eat.
- What is Nutrition? It means nourishment or in other words, the food and drink animals and humans need to stay healthy.
- What types of food do animals eat? Understand that all animals and humans have a diet that suits them; their place in the food chain justifies it.
- Children learn that animals can be classified as herbivores, carnivores or omnivores based on their diet.
- Then it’s time to get active. Ask each child to represent an animal (perhaps they could choose their favourite one).
- They should then divide themselves into groups of who would eat meat, plants and both.
- To finish up, assess and make observations on the features of each group as a class.
- They can cut out images of animals, paste them into the correct group, and identify a possible food source for each animal.
Outcome
- To find out about healthy and balanced diets.
- How to prepare a healthy meal.(RSHE)
- Unlike plants, which make their food by photosynthesis, animals (including humans) can’t make their own food. Instead, they have to get their food by eating plants or other animals.
- Children might think… that we only eat food to give us energy. In fact, food does a whole lot more, including providing the vitamins and nutrients we need to keep our bodies healthy.
- They might think that all fats are bad for us. But the fact is, we need a certain amount of fat in our diet for many different reasons, including building cells, helping nerves carry messages, protecting our organs and heat insulation.
- A fact of Life: www.foodafactofife.org.uk
Outcome
- To understand how many portions of food from different food groups we should eat in a day.
- To learn about what constitutes a healthy diet; how to plan healthy meals; benefits to health and wellbeing of eating nutritionally rich foods; risks associated with not eating a healthy diet including obesity and tooth decay. (RSHE)
- Children had learnt about the 5 food groups – bread, cereals and potatoes (carbohydrates), meat and fish, fruit and vegetables, milk and dairy, and fats and sugars.
- They should be able to identify some foods which belong to each of these groups.
- They can create a pictogram showing how many portions of each food group they should eat in per day.
- They can cut and paste the pictogram symbols provided, or draw their own. (Record data)
- Children can make a food diary by recording all the food and drink they ate yesterday and will eat today.
- Then produce a tally chart and bar chart showing how many of each food type the child has eaten.
- Design your own eat well menu.
- Plan and prepare healthy smoothies in class.
- Learn more about fruit/five a day/dairy/fibre
- https://www.bbc.co.uk/education/clips/zytjmp3
- Lesson 1 - Week 1
- Lesson 2 - Week 1
- Lesson 3 - Week 1
- Lesson 4 - Week 1
- Lesson 1 - Week 2
- Lesson 2 - Week 2
- Lesson 3 - Week 2
- Lesson 4 - Week 2
Outcome
- Compare and group together a variety of everyday materials on the basis of whether they are attracted to a magnet.
- Play a guessing game to encourage theories and predictions on which items will be magnetic
- Turn their theories into questions that can be answered through scientific enquiry.
- Methodically test, classify and sort different items/ materials and thus raise more questions to consider.
- Record findings and report back on them to the class.
Outcome
- To investigate which metals are magnetic.
- Children investigate which metal classroom objects are also magnetic.
- They think about how they will make their test fair.
- Children place their results in a Venn diagram containing 2 overlapping sets, and think about in which of the 4 areas to place each result.
- They discuss the relationship between the type of metal an object is composed of and whether it is magnetic.
Outcome
- To investigate how magnets, interact with one another.
- Children learn that magnets are made up of tiny magnetic particles which have all lined up in the same direction, producing a noticeable magnetic effect (field).
- They learn that magnets always contain two poles (north and south) and that if a magnet is broken in two, each piece will still have two poles.
- Children investigate whether the poles from two magnets will attract or repel each other when brought together.
Outcome
- To predict whether two magnets will attract or repel each other, depending on which poles are facing.
- Play a game to revise and reinforce their knowledge of how magnets attract and repel depending on which poles are facing
- Work in a group to devise a magnetic game or challenge for visitors to a science fair.
Outcome
- To understand that forces are pushes and pulls which can make things move, stop or change shape.
- Play a game in teams to explore all the different ways forces can act on a variety of everyday objects.
- Classify each action as either a push, a pull or both.
- http://www.bbc.co.uk/education/clips/zkw8q6f – A compilation of clips showing forces in action.
Outcome
- To investigate that some forces need contact between two objects, but magnetic forces can act at a distance.
- Actively investigate how some forces can act without contact (gravity and magnetism).
- Explore magnetism, ask questions and attempt to answer them by planning and carrying out a fair test.
- Tabulate results and use them to draw conclusions and raise further questions.
- Investigate that magnetic forces can move things at a distance without forces touching.
Outcome
- To compare how things, move on different surfaces
- Children investigate how magnets can make objects move on different surfaces.
- They attach a metal paperclip to a book and investigate how placing it on different surfaces affects how easily a magnet can move it.
- They record their predictions and measurements in a table, and then transfer their results to a bar chart.
- A compilation of clips showing forces in action from www.bbc.co.uk
Outcome
- To set up and conduct a comparative fair test, record measurements and discuss results about how things move on different surfaces.
- Plan and investigate to compare the amount of force needed to move a toy vehicle on different surfaces making choices about whether to measure push or pull and how to keep it fair
- Evaluate, review and discuss findings (e.g. were predictions correct? Were tests fair?)
- Lesson 1 - Week 1
- Lesson 2 - Week 1
- Lesson 3 - Week 1
- Lesson 4 - Week 1
- Lesson 1 - Week 2
- Lesson 2 - Week 2
- Lesson 3 - Week 2
Outcome
- To recognise that we need light in order to see things.
- Children learn that we see things because they are either light sources that make light, and that we see them because light travels directly into our eyes, or they are non-light sources that we can see because light reflects off them into our eyes.
- They can cut out 12 different images and place them into 2 groups – light sources and non-light sources.
- Luminous/non-luminous Not all luminous objects give out light.
Outcome
- To discover through active investigation that without light we cannot see.
- Actively investigate the nature of darkness, light and sight with a torch, a cardboard box and pencil holes.
- Use findings to draw conclusions on how light travels and our dependence on light to see.
Outcome
- To describe the reflections when light is reflected from surfaces.
- To record observations and make sense of them.
- Let’s think like scientists! Use these questions to develop research skills and speaking and listening: What are the most common sources of light? Do all materials and objects reflect light? Why can you see your image clearly in some materials but not in others?
- An enlightening clip about light sources: www.youtube.com/watch?v=ifAVp0VqN70
- ‘The Light Sources’ song: www.youtube.com/watch?v=Mztpcdc6YWI
- A good source of mirror games: www.arvindguptatoys.com/arvindgupta/mirror.pdf
- Some simple experiments with light: www.lovemyscience.com/cat_light.html
- https://www.bbc.co.uk/education/clips/zb3s34j
Outcome
- To investigate the nature of reflections in mirrors through a variety of practical tasks including mirror writing, navigating mirror mazes and multiple mirror reflections.
- Mirror Writing – Write a short message. Use the mirror to reflect it into mirror code and then copy the coded message. Give it to a friend to decode using another mirror!
- Mirror Maze – Trace over an up and down line whilst only being able to look at their hand in the mirror! Can you keep to the line? Why is it so hard?
- Mirror Multiplying – Tape a pair of mirrors so they hinge together. Investigate how different items reflect in the mirrors. What happens if you open and close the hinge?
- Ask the children to look at an object in the room. Ask them, “Why do we see the object when it is not a light source?”
- Challenge them to draw a diagram of their ideas.
Outcome
- To understand that sun light can be dangerous and there are ways to protect ourselves.
- To explore the facts around safe and unsafe sun exposure and how to reduce the risk of sun damage.(RSHE)
- Discuss about: What are the colours which make up light?
- If there was no Sun, what would happen to us?
- Some parts of light can be harmful. What could happen if we don’t protect ourselves from the Sun?
- Children learn about the importance of the Sun as the ultimate energy source for all life on Earth. They also learn about different ways in which exposure to the Sun can be dangerous to humans. Children explain, and illustrate, ways in which the Sun can damage our eyes and skin and ways that this damage can be minimised.
Outcome
- To describe how shadows are formed.
- To design and carry out a fair test.
- What causes a shadow?: www.youtube.com/watch?v=bI6k7rLFVfs
- Interactive games and activity ideas: www.bbc.co.uk/schools/scienceclips/ages/7_8/light_ shadows.shtml
- Looking at materials and shadows: www.bbc.co.uk/learningzone/clips/how-do-diferentmaterials-afect-shadows/6663.html
Outcome
- To investigate what makes shadows bigger or smaller?
- Investigate what happens when the distance between an object (such as a teddy) and the screen is kept the same and the light source is gradually moved further away.
- They could identify what is kept the same (the screen, the teddy and the brightness of the light source), what is changed (the distance between the object and the light source), and what they see changing (the size of the shadow).
- You can challenge them to systematically change the distance between the light source and the object, and to measure the height of the shadow.
- Show ‘Where does light and shade come from?’ www.bbc.co.uk/learningzone/clips/ how-does-light-create-shadows/2172.
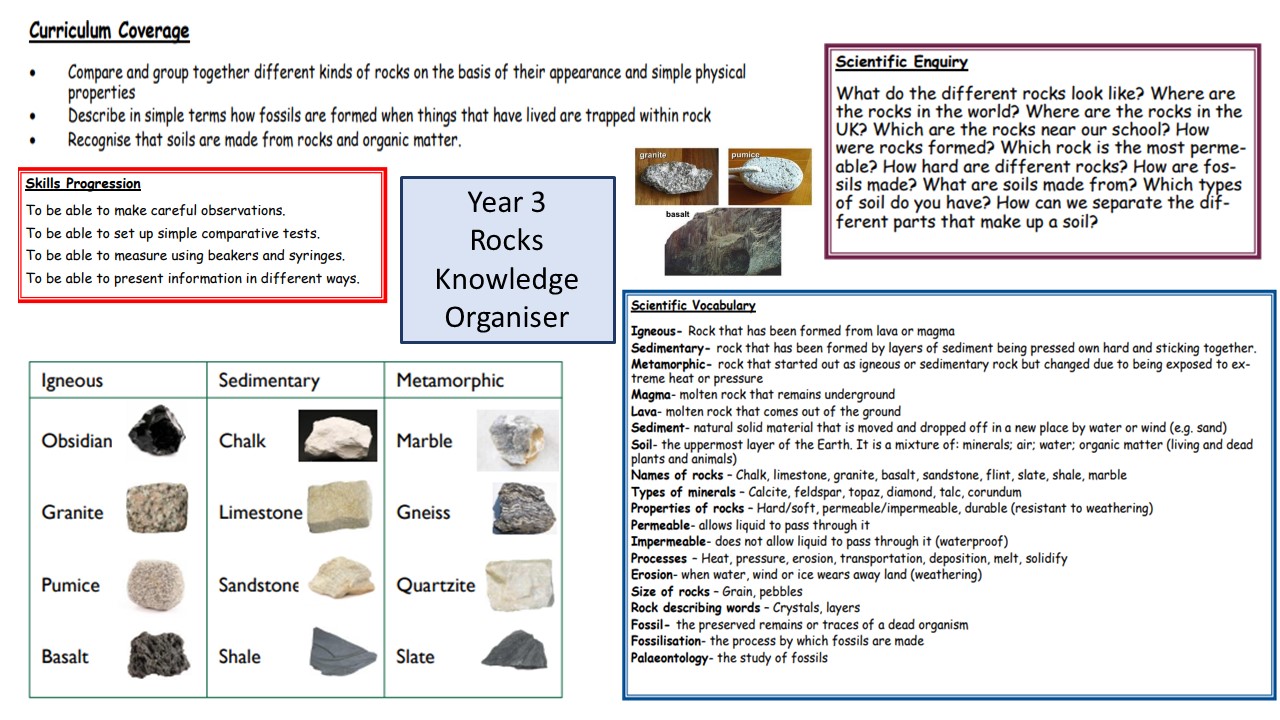
Knowledge Organisers


![]()
![]()
![]()
